Saturday 27 May 2023

Shopify - Multiple product discount using permalinks without an app

Sometimes you want to be able to add a "buy X and save" button to automatically add more than one item to the cart and add a discount. This can't be done using the built-in features so needs something custom. There are a few apps that can do it, but they each have a recurring monthly fee.

Shopify permalinks offer a way to perform multiple checkout actions on redirect to a URL, including adding to cart multiple items and even adding a discount code.

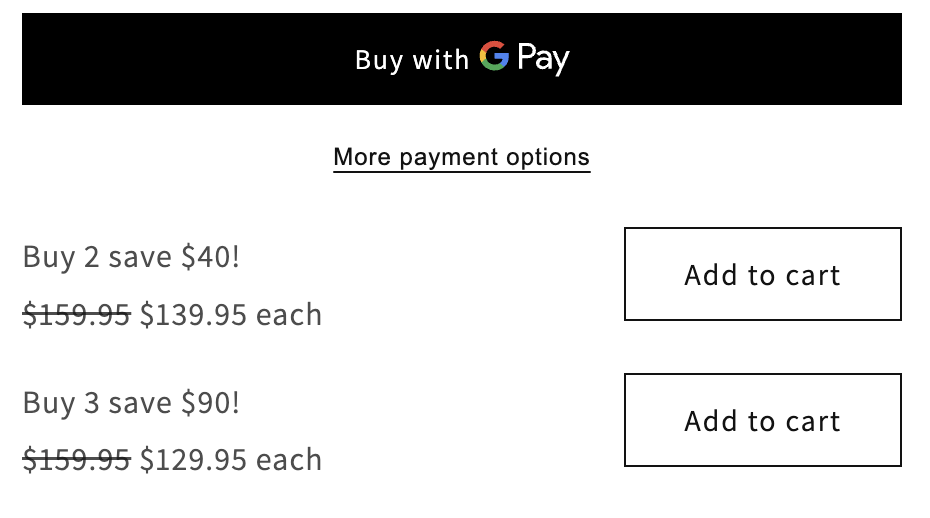
Here is an example of how to achieve buying 3 of the same item and applying an already created discount code:


1. Create a custom liquid segment in the right place for you


2. Add the code below, ensuring the URL and the product ID is correct (this can be found by inspecting the HTML of your site add-to-cart button)

```

<div style="max-width:440px;">
  <div style="width:50%; float: left">
    <label>Buy 3 save $90!</label>
    <br />
    <label><s>{{product.price | money }}</s> {{product.price | minus: 3000.0 | money}} each</label>
  </div>
  <div style="float: right;">
    <button class="button button--half-width button--secondary" onclick="window.location.href='http://shopify-store.com/cart/12345678:3?discount=BUY-THREE';">
      Add to cart
    </button>
  </div>
</div>
<br />
<br />

```


Done!


Friday 19 May 2023

Shopify - Add a custom Google font without editing the theme code

Most of the guides online showing you how to add a custom font, say a Google font, by editing the theme liquid files. This can be a bad idea because come upgrade time you may find yourself trying to remember all the little changes you made to the theme files over time that are no longer compatible with the upgraded theme.


Here is how you can add a custom font without editing the theme code directly, rather using the "custom liquid" block within your sites page:


Steps

1. Edit the theme you want to modify


2. Add a custom liquid block


3. Insert the following code in to that custom liquid block, making the changes required for your desired font:

<script>
    var link = document.createElement('link');
    link.setAttribute('rel', 'stylesheet');
    link.setAttribute('type', 'text/css');
    link.setAttribute('href', 'https://fonts.googleapis.com/css?family=Sofia');
    document.head.appendChild(link);
</script>


4. Optionally override a single block element CSS to modify the text you want to change

Note: You may need to work out what html/css element is being used to display the text element you want to change, which in this case is a <h2> element:


5. Modify the element CSS overriding the html element we found above:

eg: 

h2 {
    font-family: "Sofia", sans-serif;
    font-size: 1.2em;
}


Final output can be seen below, the "Browse our latest products" now has a new custom font:


Thursday 9 July 2020

Puppet training VM, Virtualbox, Mac setup and config

Youtube video tutorials
Youtube Puppet training

Puppet 6.10 VM download


Couldn't get VM to receive request on port 80/443 so did port redirect based on this article


When the VM booted the HTTP port didn't seem to show the quest guide as expected, instead it showed the nginx default boot screen "Welcome to nginx".


Edit the nginx default.conf file to set the http root directory

vi /etc/nginx/conf.d/default.conf


Modify the location section to look like this:

location / {
        root   /usr/src/puppet-quest-guide/_book;
        index  index.html index.htm;
    }

Reboot nginx

sudo systemctl restart nginx


Puppet Enterprise:
  username: admin
  password: puppetlabs